Working with PDFs – or ‘How I learned to stop worrying and go with the workflow’

By Eleanor Abraham

‘How do you extract text from a PDF?’

This is a question I see posed quite regularly in writers’ forums – and sometimes in editors’ forums too.

There are a couple of ways to convert a PDF into a text file, but I’m not going to tell you about them.

Am I some kind of jerk? Quite possibly, however, that is not immediately relevant to the original question. In response to the first question I would ask another question (definitely a jerk): ‘Why do you want to?’

Panic

A quite common answer is that a writer has just had their book formatted but they have spotted the breed of typo that only reveals itself after paying for typesetting. The writer panics. For whatever reason, they think that, rather than asking their typesetter to make the changes, it might be necessary/better/cheaper/less embarrassing to make the changes themselves. Maybe they will even find some magic workaround (that two dozen internet-forum publishing experts will be only too glad to tell them about).

But this is not a good option.

The simplest solution

The simplest solution – even if it’s potentially a bit awkward, given that they told the typesetter the book was the (last, final-final, very correct, no mistakes, yes I hired a proofreader, definitely) final draft – is to ask the typesetter to make the changes in InDesign and export the PDF again. (InDesign is the desktop publishing software that the majority of typesetters in the industry use to create book interiors.)
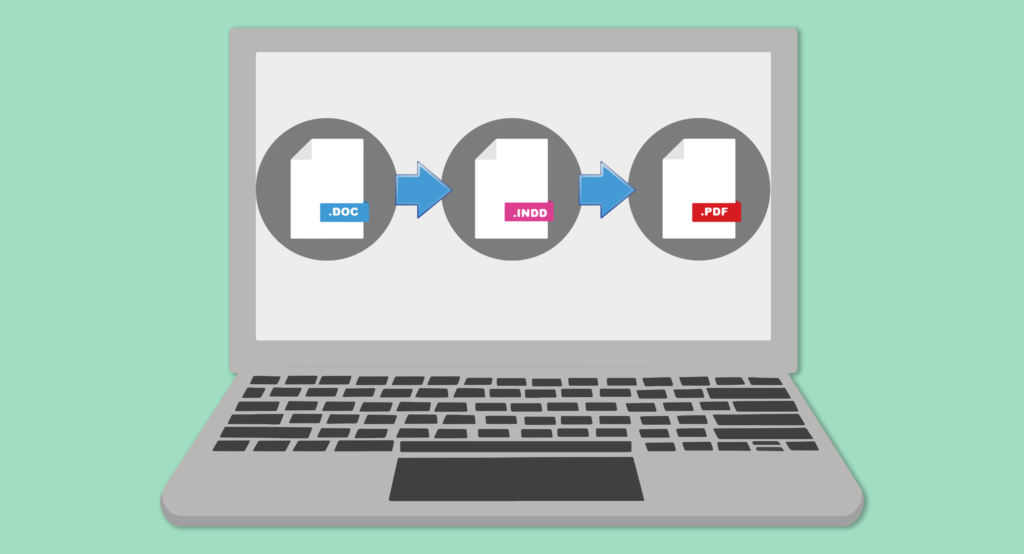
A graphic showing a Word doc being imported into an InDesign file, from which is a PDF is then exported.
The order of the workflow: A Word doc is imported into an InDesign file, then exported to a PDF (and potentially also an ePub)

PDFs from publishers

In another scenario, an editor will be given a PDF to mark up. I’ve seen some editors panic and assume the client has made a mistake. (In the editors’ forum, three dozen other editors concur, saying ‘Editing must be done in Word alone – so mote it be!’)

But a publisher client is unlikely to thank you for returning a marked-up Word file when they wanted a marked-up PDF.

It is now possible to import PDF comments into an InDesign file. It’s a great feature that means that any last-stage layout correction is quicker and easier to do.

So, changing the format of the file from a PDF to a Word document might create a lot of work for your publisher client.

Good communication and understanding the brief are key. I also think that knowledge of a project’s workflow allows you to appreciate why you’d be better doing things in a certain way.

Editing PDFs

Another common question is: ‘Can you edit a PDF?’

Yes (four dozen people in the editors’ forum will tell you) it is possible to change the text of a PDF.

But just because it’s possible doesn’t mean you should do it.

To be clear, I’m not talking about using the comment and stamp tools in Acrobat Reader, but using the text editing tools that are available in Acrobat Pro.

Imagine the scenario we mentioned above of a self-publisher who has realised their beautifully designed book interior did actually need a proofread after all. The client contacts an editor to ask them to correct their gorgeous mistake-ridden text directly in the PDF.

Do not be tempted to do that.

In this instance, we really need to contact the typesetter to get them to do the corrections in InDesign. Or, if the book’s mistakes are extensive, ask the typesetter to export the text from InDesign into Word again so that it can be proofread. They can do this in a way that retains all the paragraph and character styles, that can then (theoretically) be smoothly re-imported back into the InDesign layout.

File-version control

For reasons of file-version control, and to futureproof any later editions of a book, final text corrections need to be done in a master file, and by the end of the project that file will probably be the book’s InDesign layout. Changing the actual PDF means that if you come to update, publish in a new format, or repurpose the text, the last corrections won’t be in the very file that would have been the best source for the new edition. Doing the corrections in the PDF may create a problematic layout, with uneven lines or unjustified paragraphs. It might also mean fonts do not appear as they should. All this would have been easily avoided by using InDesign.

The secret’s out…

OK, I admit it, I proofread PDFs a lot, and I do extract text to Word. But I do it in order to run macros for consistency checks. If I find mistakes via the Word file I then mark them up in the PDF… because that is what the client wants.

TL;DR (Too long; didn’t read)

Can you extract text from a PDF in order to edit it? Yes, but just because you can doesn’t mean you should.

ABOUT THE AUTHOR

Eleanor Abraham has worked in book publishing for over 25 years, including (simultaneously) a stint in production journalism for about 10. She is an editor, typesetter, occasional writer, perpetual cat bore, and a CIEP Advanced Professional Member. Her specialist areas include commercial fiction, humour, computer science, Scottish interest, and – a sub-genre that is admittedly rare – the comedy cookbook.

https://eleanorabraham.com

You can follow Eleanor on Twitter

 https://twitter.com/EBAeditorial

Pic credit: Montage uses pics courtesy of evrywheremedia and OpenClipart-Vectors from Pixabay.

Proofreading Theses and Dissertations by Alison Chand

A little about how I started:

When I started out in proofreading and copy-editing in 2012, towards the tail end of my PhD, my work mainly involved some casual proof-editing of other postgraduates’ work mostly in the form of dissertations and PhD theses, to make a bit of extra cash. After the birth of my daughter later that year, I began to take editing more seriously and, on the most part, this was still the kind of work I pursued. I did some training courses in editing, starting with Chapterhouse’s distance learning course in proofreading and copy-editing and followed by the SfEP’s (now ciep) introductory day courses on the same subjects. I’ve picked up new training most years, including the SfEP’s follow-up Proofreading Progress, Copy-editing Headway and Copy-editing Progress courses. Throughout this time, my main area of work has remained student theses and dissertations.

Building experience:

I worked (and continue to work) independently on student theses with students contacting me through my lecturing work at the University of Strathclyde and the University of the Highlands and Islands. Now, though, I am also approached via the ciep Directory and Glasgow Editors’ Network. In 2012, I also became a freelance proofreader and copy-editor for ProofreadMyEssay (now rebranded as Proofed) and continue to undertake work for this company. As a result of my background in lecturing and university-level teaching, I was aware of some of the ethical issues involved in editing for students, and knew that I could not, for example, draw a student’s attention to factual inaccuracies when editing their work. Over the last six years I have gradually honed my craft, becoming more accomplished in tasks such as using tracked changes, working with references and formatting.

I entered the ciep (at that point as an Associate of SfEP) in 2012, moving to Intermediate member. Early in 2019 I upgraded to Professional membership status, a process which took up quite a bit of time. After taking a break from gathering evidence of my training, and not wanting to rest on my laurels, my thoughts turned to what training I should do next. It occurred to me that I had never actually undertaken any official training in the kind of editing I do the most – proofreading and copy-editing theses and dissertations.

Proofreading Theses and Dissertations – online course:

Before embarking on the ciep Proofreading Theses and Dissertations online course, I got hold of a copy of the ciep’s guide on the topic, which introduces the issues involved in working with students. These include specific requirements for calculating fees and working on samples, as well as ethical considerations associated with, for example, plagiarism and fact-checking. The basic principles of proofreading theses and dissertations discussed in the guide served as a useful introduction to the requirements and techniques involved in editing for students, while rightly pointing to the need for more in-depth consideration of some of the issues raised. With the intention of ascertaining whether my work practice fitted with ciep recommendations and looking for pointers for improvement, I decided to embark on the online course.

The Proofreading Theses and Dissertations course is divided into six sections and has ten exercises to complete, with corresponding examples and model answers where relevant. The sections entitled ‘First contact’ and ‘Negotiation’ give much useful insight into how to correspond with students and negotiating a fee. For me, the examples given of work agreement forms in these sections were particularly useful – while I normally agreed terms with students by email, undertaking the course prompted me to develop a work agreement form of my own. I now stipulate the work I will and will not be able to undertake for students, which adds another layer of professionalism and transparency to my work. I have since found that using the form and sending it to students helps me clarify with them some of the ethical issues involved in editing their work, such as plagiarism and the necessity for dissertations to represent their own original work. These issues are raised in the fourth section of the online course. The fifth section covers different formats, which was useful in its explanations of working with LaTeX files. While I am comfortable working in Word and, to a lesser extent, with PDF documents, I have steadfastly avoided LaTeX files, but, if I decide to take the plunge in future, I’ll have my notes from this course to guide me! I found the final section, entitled ‘Pulling it all together’, a very effective way of drawing together all the information and guidance presented in the course.

Overall, then, I think that the online Proofreading Theses and Dissertations course offers a highly useful introduction to this kind of editing work for those new to it, but also has useful insights for proofreaders and editors who have, like me, worked on theses and dissertations before, and are looking for ways to improve their methods of working. Studying it was certainly a good use of my time!

Working with a Proofreader on your Thesis or Dissertation

By Susan Milligan

So you have finished your dissertation or thesis and you are ready to have it proofread. So much effort has gone into it and now you are nearly ready to submit it. You want it to be as good as it possibly can be but sometimes we are so close to our own work that we can’t see the simple mistakes in spelling or grammar that we can all make. Or perhaps English is not your first language and you need to be sure that you have not made errors in word choice or style that will detract from the flow of your argument.

You can find professional proofreaders in this website or in the Directory of the Chartered Institute of Editing and Proofreading. Once you have chosen who to contact, the next thing is to email them asking if they can do the work and how much it will cost.

Your first email to the proofreader

Address the proofreader by name (‘Hi Pat’) and don’t just begin ‘Hi, I’d like …’. Many professional proofreaders are suspicious of emails that don’t use their name and don’t answer them.

If you can, send the email from your university or college email address, rather than from a generic address on your phone. It indicates you are serious in your enquiry.

In your first email, mention:

  • the title or subject area of your dissertation
  • its word count (including any footnotes or appendices)
  • how many tables it has (or other special features that you want to include in the proofread)
  • your time frame – when you will have it ready to send and when you need it back
  • what you want done – just a proofread for language issues, or do you also require some formatting work, and is there any work to be done on the references?

What will the proofreader ask you?

You can expect the proofreader to ask you for a few things at this stage:

  • a representative sample of your text – perhaps 1,000 or 2,000 words – so that they can see the level of proofread that might be required and quote a fair fee based on this
  • the name of your institution and the name and contact details of your supervisor – so that they can be sure that your supervisor has given approval for your work to be proofread by a third party and it is all above board
  • your institution’s guidance or rules on formatting or style for the submission of theses and dissertations – if it’s published online, where this can be found.

How much time will you need?

Many proofreaders are busy (a good sign!), so don’t leave it late to try to find one. You are more likely to find the person you need if you can give them reasonable notice. You will save yourself some stress by not leaving it till the last minute.

Be realistic about the time this stage will take. You need to factor in time for correspondence with the proofreader, because they may need to check things with you as they read through your text. Think in terms of weeks rather than days.

After you receive the work back from the proofreader you will need some time to review their corrections and comments. You won’t be able to submit it immediately after the proofread – you need to allow some time for this.

What can a proofreader do for you?

Your institution will have rules about what interventions are allowed by a third party – you should know what these are. A professional proofreader will work to a code of conduct that ensures everything they do is ethical. This protects you as well as the proofreader.

For example, a proofreader generally will correct:

  • typographical errors – simple slips
  • mistakes in spelling, grammar and punctuation
  • simple formatting errors such as wrong fonts, spacing issues, messy paragraph alignment
  • inconsistencies in language – e.g. differences in spelling, capitalisation or abbreviation of the same term.

Your proofreader will be able to point out to you (for your own decision and correction if necessary):

  • language that makes your meaning unclear
  • repetition
  • poor logic flow in the language (though not in the argument of your thesis)
  • citations that do not match the references (if this is agreed as part of the work).

Your proofreader will not do this:

  • rewrite bits of your text
  • check your facts
  • check the content of your references
  • compile your references list
  • raise issues that have to do with the quality of your arguments or your evidence.

Getting the best service from your proofreader

Your dissertation is all your own work and should still be all your own work after it has been proofread. A professional proofreader understands this. They will never cross the line into ‘improving’ the work or anything else that would invalidate your research.

Follow these simple guidelines to avoid adding unnecessary stress and delay to the process of getting your dissertation finished and submitted. You will get the most value out of your proofreader and do the most credit to your own hard work.

Susan Milligan

With acknowledgement to the CIEP Guide Proofreading Theses and Dissertations by Stephen Cashmore. Thanks also to Alison Chand.

Facing the fear – sitting the basic editorial test

Alison Chand shares her experience of preparing for and taking the Society for Editors and Proofreader’s (SfEP’s) Professional Membership test.

Spoiler alert … she passed, and so could you!


I fell into proofreading and copy-editing in 2012, towards the tail end of my PhD, doing some casual proof-editing of other postgraduates’ work to make a bit of extra cash. After the birth of my daughter later that year, this work turned more serious, and I started doing bits and pieces of training, starting with Chapterhouse’s distance learning course in proofreading and copy-editing and followed up by the SfEP’s introductory day courses on the same subjects. Over the years, I’ve worked away at proofreading and copy-editing in various forms, picking up new training along the way in the form of the SfEP’s follow-up Proofreading Progress, Copy-editing Headway and Copy-editing Progress courses. 

I entered the SfEP as a then Associate in 2012, later becoming an Intermediate Member, and at the back of my mind had always planned to upgrade to Professional Membership status when I had gathered ‘enough’ experience … but the years were busy (my son arrived in November 2015), life was frantic, and, anyway, when would I feel ‘experienced’ enough?! Last year, five years from when I first joined the SfEP and began my foray into the world of editing, I finally decided to have a serious look at upgrading. 

I found, on examining the relevant area of the website, that I easily met all the points requirements: I had accumulated more than the specified 25 points, including more than the required ten training points and five experience points, and I was in a position to supply the names of several clients prepared to provide references for me. My main problem (and one which had often resulted in personal feelings of inadequacy about my status as a proofreader and copy-editor over the years) was that hardly any of my freelance work had been for publishers, and most of the projects I had worked on had been for academics or students, meaning that my references could not verify the quality of my work. 

A bit of investigation revealed that my main way around this involved taking the SfEP’s basic editorial test … an idea that filled me with some fear! What if I failed and proved to myself that because I had never worked for publishers, I could never know what I was talking about? A quick search of the SfEP website revealed that the basic editorial test is a ‘straightforward’ multiple choice test requiring in-depth knowledge of the areas outlined in the editorial syllabus and awareness of the SfEP code of practice. One hour is allowed for completion of the test. Still a bit unclear about exactly what kind of multiple choice test this was and what exactly was involved, I spent around a month revising these areas and perusing the pages of New Hart’s Rules, before eventually sitting the test at the end of November 2017. 

It had been a long time since I had sat a test or exam like this, with any editing tests I had undertaken before this all involving actual editing, rather than learned knowledge, and my nerves meant that I initially panicked a bit when I realised that more than one multiple choice option was available in a lot of questions (what if I missed answers out?). I also found that the first ‘half’ of the test (a notification appeared on screen at the halfway point) took me much longer than the second half, injecting some new nerves that I wouldn’t finish in time and would throw away unnecessary marks. However, I made it to the end with five minutes to spare for a quick check through of my answers. My result appeared on screen immediately and, happily, I scored 80%, enough for a pass and nine points towards my upgrade application. 

Overall, my experience of actually taking the test was less stressful than the anticipation. I identified a couple of areas where improvements could be made – I think it would be useful to know in advance that some questions are worth more points than others and will therefore take longer. I also threw away five points on a question asking me to match particular characters to their description – I duly wrote in the names of the characters only to find that I should have typed in the letter/character representing the word. I think it might have been useful if this question had been clearer. However, on the whole, taking the test gave me a chance to revise useful areas of proofreading and copy-editing with which I don’t always work on a daily basis, and my result gave me the confidence to (finally) proceed with upgrading my membership of the SfEP.

I started the upgrade process to Professional membership in December 2017 and actually found the gathering together of information quite therapeutic in comparison to the editing test. Luckily, I had saved all my training certificates as I went along and also kept an updated spreadsheet with details of all my working hours, dates and clients (this has more than once felt like a bit of a pain but proved to be a godsend!). Rather than entering all my work into the application form, I attached this spreadsheet as evidence of my work experience. I selected two recent clients as references and, after a bit of chasing up to encourage the second one to send in his form, my application was in and, a few weeks later, I received confirmation of my success in upgrading – I am now proud to be a Professional member. While completion of the editing test was definitely the most stressful part of the process, my success in passing it has given me confidence to call myself a Professional Member and feel that I deserve the title. I’d encourage anyone thinking about it to have a go! 

Alison is a proud Professional Member of the SfEP and combines copy-editing and proofreading with her academic roles and an active family life.

Copy-editing Headway – a course review

Post by Alison Chand

In an attempt to track the useful elements of training courses I undertake, and areas with the potential to be more helpful, here’s a brief summary of my experiences completing CE2, or Copy-editing Headway.

Training completed before CE2

I came to editing as someone who fancied myself as pretty good with spelling and grammar. I quickly realised, on dipping my toe into Chapterhouse’s distance learning course in proofreading and copy-editing, that a successful career in the field would involve a bit more than this!

I completed this course in early 2012, but still felt I had many, many things to learn about becoming a freelance proofreader and copy-editor. I resolved to dedicate time each year to CPD and training courses. 2013 saw me undertake the SfEP’s introductory day courses on proofreading and copy-editing, and in 2014 I tackled Proofreading Progress, before it was split into two courses. My training plans went a bit off course in 2015 and 2016 with the birth of Euan, my second child, but in 2017 I determined to get back on track. So, I signed up for CE2, Copy-editing Headway.

With my previous lack of experience of using proofreading and editing symbols, I’d already found Proofreading Progress challenging and quite a big step up from the introductory day course on proofreading, so I was encouraged by the fact that CE2 promised to be a midway step between the Introduction to Copy-editing and CE3, Copy-editing Progress, particularly as my completion of the introductory course was now three years in the past. I signed up for CE2 in February this year, and was promptly assigned a tutor – Jane Moody, the SfEP’s Director for Professional Development.

Keen to get started, I embarked on the course …

Are you ready?

The opening section, entitled, ‘Are you ready?’, was, for me, the only one that I felt could do with fleshing out. It claimed to be a reminder of what copy-editors do, but the blurb at the opening indicated that CE1 should have furnished me with a knowledge of copy-editing already and the brief notes gave little practical information about how material should be laid out.

My feedback from Jane Moody on my first assignment was extremely detailed and helpful, and very useful in steering me in the correct approaches to take in several areas. I did feel, however, that an example exercise might have been a more useful way to start. The current set-up made me feel a bit of a failure for not remembering much of the course I had done three years previously, but a few quick reminders in Jane Moody’s feedback were sufficient to help me out.

I also felt that the notes provided for this section could have provided a few practical summary points, with an example exercise providing a reminder of how to lay out material. This could easily be done without going over all of CE1, but would take account of the fact that different time periods have passed since participants in CE2 have completed CE1.

The rest of the course

The remainder of the course is divided into four further sections on coding and displaying material; editorial style; bibliographies; and images, photographs and figures. The course notes for these sections were much more useful than those from the first section, and a lot of the material from section 2 on coding and display might usefully have been incorporated into the first section.

Some of the material here served as a reminder of what I knew already, and some was new, but everything was well laid out and useful, and a clear model answer was given for the first practice exercise, allowing me to compare my own work with how it should have been laid out. I think model answers are great for learning and the practice exercises in CE2 made good use of these.

Section 3, on editorial style and what should be included in a style sheet, provided a very helpful example style sheet and I was able to make tweaks to my existing style sheet template for proof-editing purposes. Furnished with the advice provided in sections 2 and 3, I felt much more confident in tackling the second assignment for marking and duly performed much better in it.

Overall, the course offered a good balance between editing on screen and on hard copy. However, while it was useful to do this second assignment on hard copy, I would have found it helpful to do an additional assignment on screen as well as the first one (which I didn’t feel adequately prepared to do justice), before embarking on the final assignment. I should point out that, for the second assignment, as for the others, I received detailed and thorough feedback from Jane Moody, very promptly after I had sent the work.

The information about copy-editing bibliographies in section 4 also incorporated a useful practice exercise. I’ve worked quite a bit with bibliographies for academic authors, so probably felt more comfortable with this material. Much of the material in section 5, though, on images, photographs and figures, was new to me.

As section 5 culminated with completion of the final assignment, it would’ve been useful to see practical examples of how completed work should be laid out in advance of doing the assignment. The course notes were detailed and useful, but stated an assumption that those completing the course would know how to cue images into edited work from CE1. As with the first section, I found this problematic as I had completed CE1 some three years previously. Without going over this material again in great detail, a quick summary of how to do this, perhaps as part of a practical example, would not have gone amiss.

Overall thoughts …

Overall, my experience of completing and, happily, passing CE2 was a positive one. The feedback from my tutor was prompt, helpful and constructive; and, while it might have been useful for the course to have involved fewer assumptions about knowledge from CE1 and to have included more practical examples of material layout, I was still pleased by the level of detail in the course notes and by the organisation of the course.

ABOUT THE AUTHOR

Alison Chand is a freelance proofreader, copy-editor and oral historian (and swimming teacher!). Her editing work is mostly in academic material, including student dissertations and theses, and academic books and journal articles. Alison is a Professional Member of the ciep.

Tiny macros

Post by Stephen Cashmore

If I say the word ‘macro’, what effect does it have on you? Do you think, ‘Let’s change the subject and move on?’ Do you run screaming from the room? Do you perhaps think, ‘Yes, yes, they can be useful sometimes; I’ve downloaded a few. But let’s not get carried away by them.’?

If you are a serious editor and one of these descriptions fits you, I suggest you brace yourself and think again. Macros can be useful ALL THE TIME.

They don’t have to be gigantic, use once-in-an-edit affairs. They can be tiny little constructions that can save you time simply because they crop up time and time again. They can be devised specifically for the job at hand. If you find yourself doing the same thing – typing the same keystrokes – over and over and over again, the chances are that a simple macro will do the job for you.

Let me give you some examples.

In a novel I was editing recently, the author had a terrible habit of using comma splices.

The sun shone through the window, he decided to get up and do some editing.

Time and time again. Gah.

Some were best dealt with by inserting ’and’ or suchlike, but most needed a new sentence. Delete comma. Full point. Skip a space. Delete small letter. Replace with capital letter. Again and again. You can see what’s coming. I recorded a simple macro that did all this with one click. What a relief.

The same author continually muddled the punctuation at the end of dialogue.

‘I think this should be a comma.’ He said.

I imagine the author thought the dialogue needed a full stop as it’s a complete sentence, and Word did the rest. So, a simple macro to do the opposite of the previous one, only skipping an extra space (because of the quote mark). By the time I’d got about a quarter of the way through the edit, I had a little row of tiny macros that speeded up my working enormously.

How about this, from a maths book?

–9+16=7

Full marks, I hear you say. The trouble is, the publisher wanted thin spaces marked with red hashes around all operands such as minus sign, equals sign, plus sign and so forth. So I used the FRedit macro do to that for me and it save me hours and hours of work. But it also did this:

##9#+#16#=#7

Almost perfect, but those two initial hashes aren’t needed. So I recorded a tiny macro to do <delete><skip space><delete> and that speeded up all these problems for me, including some that I hadn’t thought of.  I also wrote a tiny macro that surrounded a character with red hashes, for instances that I hadn’t thought of when I made up my FRedit script. And I recorded a macro that changed the number of a question from

12. Question

to

12             Question

and I …

Well, I’m sure you get the idea. Write a tiny macro for keystrokes that you find yourself doing over and over again, and before you know it you’ll have a little group of them that will, believe me, save you both a lot of time and your sanity.

ABOUT THE AUTHOR

Stephen is an advanced member of the SfEP who lives in Ayr on the west coast of Scotland. He is an ex-teacher, ex-accountant, ex-bridge player and ex-auditor, but threw all that over to become an editor after taking early retirement. Check out cashmoreeditorial.com or follow Stephen on Twitter @sceditorial

My top takeaways from the 2017 SfEP Scottish mini-conference

Post by Jill Broom

As I sat on the 8.15 train from Glasgow Queen Street to Edinburgh last Friday morning, I was feeling excited about what the day would bring. Some of that excitement may have had something to do with the promise of my bestie’s hen weekend beginning later that evening, but the rest of the day was shaping up to be good too … I was off to the SfEP Scottish mini-conference.

As someone who works from home, I look upon it as a rare treat to get caught up in the bustle of rush hour. (I know. I’m probably mad.) And to have an hour’s commute when I can get through my admin before the ‘real’ start of the day? Well, that is awesome.

Although that morning my admin mostly consisted of organising my kids’ social lives by text, my mind was ultimately focused on my profession. This was going to be a day about developing and reaffirming my skills.

Why did I go to this SfEP conference?

Freelancing can be a lonely business. Holed up in a home office for days on end without seeing many people doesn’t always a fun Jill make. So, these events are important to me. Meeting up with, learning from and chatting to other editorial professionals every so often makes me feel less isolated.

What did I get out of it?

Well, loads of course … but there were three key things for me.

1. Trust your instinct (& don’t fret about strict grammar conventions)

Did you know that most current grammar books are outdated? Some merely contain rehashed guidance written 100+ years ago. OK, so don’t panic! There’s no need to burn them all. But this fact does rather rain on the whole idea of the fluidity of language.

Well, while Professor of Linguistics Geoff Pullum didn’t urge us to ditch all grammar rules immediately, he did ask us to be sensible in our approach.

The issue at the heart of Pullum’s entertaining talk on Freedom and tyranny in English grammar was that we should be editing written work to sound like it belongs in 2017. He pointed out that usages people regard as grammatical errors are often just a less formal style. So, don’t over-correct. If it sounds OK, leave it alone.

This resonated with me and many other conference attendees – hence the ‘trust your instinct’ subhead. But it’s nice to have your working practices reaffirmed by a linguistics prof.

I particularly liked this example:

  • ‘Don’t worry about the passive voice; just don’t be dull.’ Hooray! This is something that’s bugged me for ages. Even Word and some Content Management Systems obsess over this. WordPress’s insistence on using instances of the passive voice to score readability drives me bonkers. If it reads well, surely that’s the most important thing?

Pullum highlighted that the same goes for a whole host of other grammar ‘rules’. For example, you don’t need to ‘un-split a split infinitive if it makes sense’ and you don’t need to remove all adjectives and adverbs if they lend meaning.

And, if you’re dithering over whether to change a word to something that ‘makes more grammatical sense’, look around to see what occurs elsewhere. Ask Google. You may well find enough relevant examples to give you the confidence to leave it be.

2. Investigate and use tools that can make you more efficient

One of the things I love about SfEP conferences is that members are always willing to share their experiences to help their colleagues. And Ashley Craig’s session on commercial super-macros didn’t disappoint.

Ashley gave us live demos of Wordsnsync EditTools v8.0 and Editorium Editor’s Toolkit PLUS 2014, proving that super-macros save a lot of time by automating some of the copy-editing process.

Wordsnsync EditTools’ journal checker, which checks and corrects journal names, looked particularly handy for those regularly dealing with references, and its Insert Query tool saves you having to copy and paste or rewrite the same types of queries over and over again. But take a look for yourself. There are a whole load of other useful things these super-macros can do for you.

I’m terrible for setting aside time to look into these things and then getting caught up in some other work … But I’ve given myself a talking to after Ashley’s session.

3. Remember to be confident in what you do

How many times have you used the words ‘only’ and ‘just’ when talking about what you do for a living? Well … stop it.

Laura Poole’s pep talk reminded us that we’re not ‘only’ editors who ‘just’ tidy up other people’s writing. We provide an extremely valuable service to many different businesses, and we should talk about it using less apologetic language.

Laura also spoke about networking – something many of us recoil from. She pointed out that you don’t need to be ‘salesy’. In fact, don’t be. It’ll put people off. Just be yourself and start a natural conversation. Be interested in who you’re talking to. And when they ask what you do … think about how to talk about it in a nutshell. Can you do this in a creative way? Can you make yourself stand out from the crowd?

A week later, I’m still working on the perfect ‘elevator pitch’.  But … I know which words I won’t be including in it; I know how to make myself the most efficient proofreader and copy-editor I can be; and I know that I’m making the right calls when it comes to rejecting outdated grammatical conventions.

All in all, #SfEPSco17 was a very good day ‘out of the office’.

ABOUT THE AUTHOR

Jill is a copywriter, proofreader and copy-editor, but her biggest job is being mum to three small children, which has helped her to sharpen one of her key writing and editorial skills … adaptability! Check out her LinkedIn page or follow her on Twitter @honeybroom.

My journey into editing (so far) – Alison’s story

Post by Alison Chand

Ever wondered how a person becomes ‘an editor’? This post is the second in our ‘How I got into editing’ series. These pieces are designed to give you some insight into the varied backgrounds of our members (we’ve come from all walks of life) and how we became embroiled in the wonderful world of editing.

Here is Alison’s story …

Careers and work identities are often arrived at by accident rather than by design, and that was certainly the case for me! I began studying for my PhD (an oral history-based project exploring masculinities in male civilian workers in Clydeside during the Second World War) at the University of Strathclyde in 2009, and had grand plans of becoming a full-time academic upon completion. However, in (what I thought was) the short term, I started doing some casual proof-editing of other postgraduates’ work to make a bit of extra cash.

This continued as I progressed with my PhD and, approximately nine months before I was due to submit, I discovered that I was pregnant with my daughter. After the initial euphoria/panic waves had passed, my thoughts strayed to my working life after my studies, and I decided to look into the idea of setting up as a sole trader in proofreading and copy-editing.

Getting trained and finding support  

After a bit of (not as much as I should have done) Google exploration, I signed up for Chapterhouse’s distance learning course in proofreading and copy-editing, confidently expecting that, because I saw myself as pretty good with all things written and grammatical, the course would be fairly straightforward. I was horrified by how much I missed in the first assessment, quickly realising that I’d need to apply myself a bit more to gain the skills I needed. After nine months, I passed the course, although not exactly with flying colours. I found the online experience fairly isolating, and lacking in support for learning about a world of symbols which, as it turned out, was entirely new to me.

Luckily for me, I also discovered the Society for Editors and Proofreaders on my foray into Google, and decided to go along to a meeting of my local group, in Glasgow, in June 2012. There, I found real, friendly people, offering real advice about work options and training courses. I joined the SfEP, first as an associate, later upgrading to intermediate member, and decided to sign up to the SfEP introductory day courses on proofreading and copy-editing.

At these courses, I enjoyed being able to ask questions in person and develop my skills among other interested professionals. I set up a basic website and LinkedIn page and, before and after having my daughter, Ailsa, in October 2012, I continued to pick up work proof-editing for students, from Strathclyde and elsewhere, also passing the editing test to work freelance for ProofreadMyEssay, a company offering proof-editing to students across the English-speaking world.

The variety of [freelancing] life

When I returned to more regular working when Ailsa was nine months’ old, I gradually started to work on material other than student dissertations and theses, receiving enquiries from authors of fiction, a CV writing company, and a variety of businesses.

I studied online for the SfEP’s Proofreading Progress course and was pleased to pass this, despite finding the return to marking a hard copy with symbols a bit of a challenge! Alongside editing, I taught freelance in the History department at the University of Strathclyde and spent two evenings per week as a children’s swimming instructor, making my working life varied to say the least!

In November 2015, I gave birth to my son, Euan, and another quiet working spell followed, before I returned to the fray in summer 2016, continuing to complete editing work for students and an assortment of others, and also returning to university teaching work and swimming instruction.

What’s next?

So, to 2017! Not knowing where the next byway may lead, I plan to keep pushing for improvement and thus to undertake further training. This year, I’d like to take the SfEP’s editing test and upgrade my membership status to professional member. With this in mind, I’m currently working online on the Copy-editing Headway course, with a view to following this up with Copy-editing Progress.

As my children grow up and the work I do sprouts arms and legs, only time will tell where my road as a sole trader will take me.

I feel that I’ve come a long way since 2012. I love the flexibility of my working life now, but I still have days where I feel woefully inadequate at addressing my different areas of work, as though I’m being pulled in too many directions at one time. Nonetheless, I want to be ready for whichever path I take next, and I certainly plan for proofreading and copy-editing to be part of that …

So, I’ll keep on appearing at the always-friendly and always-helpful meetings of the Glasgow SfEP group, the members of which helped draw me into the editing world to start with and now give me a great deal of motivation to stay there.

ABOUT THE AUTHOR

Alison Chand is a freelance proofreader, copy-editor and oral historian (and swimming teacher!). Her editing work is mostly in academic material, including student dissertations and theses, and academic books and journal articles. She is an Intermediate Member of the SfEP.

Tips for editing tables in Word

Post by Merle Read and Susan Milligan

February’s Local SfEP Group meeting in Glasgow covered some exciting topics, including training events north of the border, writing more useful blog posts and the coming Scottish mini-conference. But there was also the added bonus of an extremely handy presentation on Word tables by two of the Glasgow Editors’ Network’s most experienced members, Merle Read and Susan Milligan. And this was just too useful not to share!

Whether you’re an experienced copy-editor or just starting out, editing tables can be tricky and, frankly, a bit of a faff. But with these tips* from Word gurus Merle and Susan under your belt, your efficiency will increase in no time.

* Instructions given refer to Word 2013, but plenty of the advice will apply to other versions of the program.

Getting organised in Word

Authors often use tabs or hard returns in the wrong places to make the table look right in Word: toggle Ctrl/Shift+8 to show these (or use on the Home tab). Remove unwanted spaces/tabs/returns. The typesetter will take care of the look.

Show the ruler (via the View tab) to enable easy resizing of columns, alignment of decimal tabs etc.

Use Tab to move forward and Shift+Tab to move backward in a table. Use Tab in the last cell of a table to add an extra row, or press Return with the cursor at the very far end of a row to insert a new row immediately below.

If you want an actual tab, use Ctrl+Tab.

Make a few keyboard shortcuts (instructions below) to add/delete table rows, e.g.

Alt+F9    insert row above the cursor
Alt+F10  insert row below the cursor
Alt+F11  delete current row (repeat as required to delete the table)

Changing the design and layout

To alter the table design or layout, place the cursor in the table and use the Design or Layout tabs that then appear on the ribbon or right-click for a menu that allows you to insert/delete/merge cells/rows/columns, change text direction or alter other table properties. NB merging neighbouring cells can sometimes mess things up: use with care, preferably once the rest of the table editing is complete.

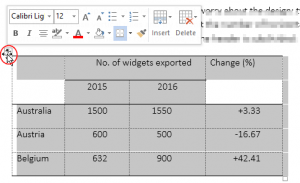
You can also use the mouse to hover over various parts of the table to enable you to alter the design/layout. Hover over a line to click and drag the column width, or click on the 4-arrowed cross at the top left corner (appears when the cursor is within the table) to bring up a mini-ribbon of options:

Screenshot of mouse hover over a Word table

Click on the cross and then press Delete to remove the table content but leave the structure intact (it may be useful to copy & paste the skeleton if you have similar tables to edit).

Use the Border Painter in the Design tab to remove/add lines (set to No Border or a specific line width as required) by drawing the cursor over the lines. Esc key to cancel.

Screenshot of Border Painter

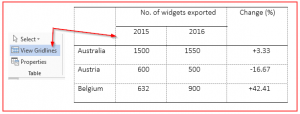
Choose the View Gridlines option in the Layout tab (the cursor must be in the table unless you have set up a shortcut to ShowTableGridlines).

SCreenshot of a Word table with gridlines showing

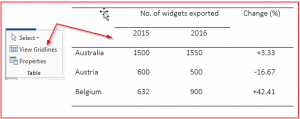
This allows the structure of the table to be clear even though various cell borders will be invisible in the final version:

Screenshot of a Word table without gridlines showing

To view an extra-wide table that disappears off the edge of the page, use Draft view (but when editing it check that it is not too wide for the page size for which is it destined in print). You could also select the table and reduce the font size for a better fit: let the designer worry about the look! Or change the page format to landscape (you may need to insert section breaks if the other pages are to remain portrait).

If copy & pasting, make sure the number of rows/columns being copied is no larger than the area of the table being pasted to.

Avoid using Track Changes when editing tables if possible (or at least don’t use it when formatting).

Checking your table is correct

Convert table to text and text to table (Insert tab, Table menu) as a temporary tool while editing (e.g. 2-column lists). This is also a way of testing whether a table is presented correctly – a correct table should convert to text and back again (one cell – one entry – no hard returns within cells).

To align numbers in columns on the decimal point (or on the right-hand digit if there is no decimal point), first left-align the column and then select the decimal tab from the top left of the ruler; then, with the whole column selected, place the tab on the ruler above the column heading at your chosen position.

Achieving consistency with Word tables

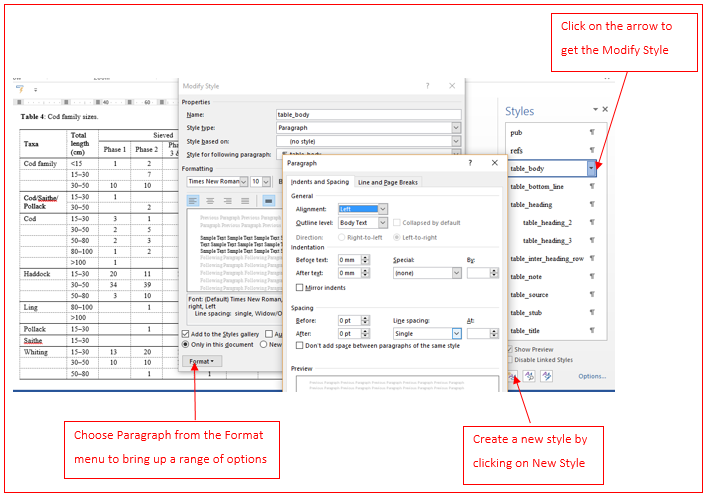
To format a series of tables consistently, use Word’s styles (either in the document or, preferably, in a custom template attached to the document). You can create paragraph styles for table title, column heading, table stub, table body, table bottom row (for tables that have a ‘Total’ row at the end), etc. If you base them all on one core style (e.g. ‘table text’), all will change if you make a change to that style (e.g. to change the font).

Screenshot of Word Styles dialog box

It’s fine to use the same font, size, formatting, and paragraph attributes for all the table styles if you are using styles not for the sake of the appearance of the tables (as it is the typesetter’s job to design them) but for efficiency and consistency. List the styles used for the typesetter, who can then convert the Word styles to the desired formatting in InDesign.

What if there are footnotes in the table?

If your author has embedded tables in a document that have auto-numbered notes, check that the tables don’t contain footnotes that are part of this numbering system. If they do, take these notes out of auto-numbering (or cut and paste the tables into a new document) and manually renumber the table footnotes (using alphabetic rather than numeric numbering). If a table just has one note, you can use an asterisk to indicate it (depending on house style). If it is a note that applies to the whole table, it will just appear below the table as ‘Note. …’.

There may also be a ‘Source’ below the table, normally positioned after any table note(s).

How to add a keyboard shortcut

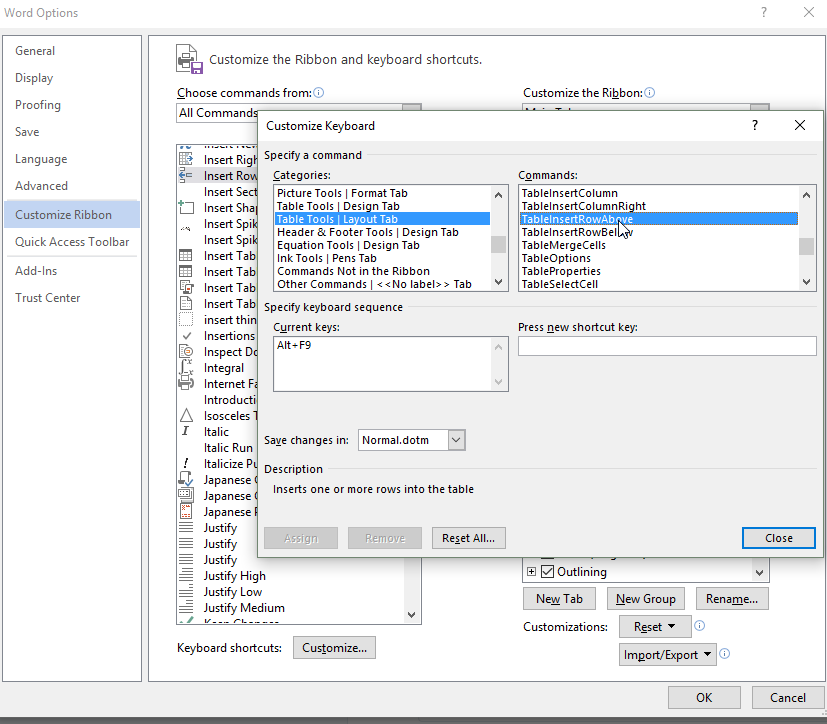
Go to File/Options/Customize Ribbon/

Creating a Word keyboard shortcut

In the Categories box choose Table Tools | Layout Tab.

In the Commands box choose e.g. TableInsertRowAbove.

In the Press new shortcut key box, type the desired key combination, e.g. Alt+F9 (check it’s not already assigned to something you already use: if so, “Currently assigned to …” will be displayed).

Click Assign (essential!) then either return to the Commands box to add another shortcut, or click Close.

Keep a reminder of your shortcuts by printing them out. Bring up the Print dialog box. Under the Settings heading click on the Print All Pages dropdown. Under Document Info, choose Key Assignments, then click Print.


Do you have any tips of your own to add to these? Be sure to leave a comment. Or if you’d like to find out more, we’ve listed some relevant resources below.

Further reading

Butcher’s Copy-editing, 4th edn, pp. 220–9

Scientific Style and Format, 8th edn, ch. 30; 6th edn, ch. 31, pp. 678–93

See also https://wordribbon.tips.net/C0683_Tables.html

ABOUT THE AUTHORS

Susan has learned about tables over the years by having to deal with them when editing on screen, as well as from an SfEP conference workshop on the subject by Penny Howes in 2009. Tables used to be a chore but she now enjoys getting to grips with them.

Merle (@MA_Read) has been wrangling with Word tables for over 20 years and tries to do so as efficiently as possible.

Everyone needs an editor

Post by Chris Bryce

‘If only I hadn’t said that’ … a phrase familiar to the broken-hearted following a heated row, or the regretful employee the morning after the office party. What would the miserable lover or tipsy partygoer have given for a filter on their spoken words? The answer would probably be … anything!

Given half a chance, they would have spotted their errors, stopped the conversation, cut out the offending sections of dialogue, reformatted the chat and started again.

Luckily, it’s different for the written word, because the writer can choose to get a fresh pair of eyes to act as that filter. And if those eyes are inside the head of a professional editor, who understands exactly where and why mistakes are made, then the writer will never have the unpleasant task of trying to claw back the words they’ve put on paper.

What do editors do?

Copy-editors know how to make words work well and deal with a wide variety of text – from T-shirt slogans, website wording and marketing materials, to academic papers, technical manuals and published books.

Whatever they’re working on, the copy-editor’s aim is always to improve the wording and format. Often referred to as the seven Cs of editing, an editor’s focus is to make the text: clear, correct, coherent, complete, concise, consistent and credible.

The human brain is hard-wired to fill in the blanks as we read. This gives us the ability to speed-read or scan our eyes over text. It’s a useful skill when we want to take in lots of information quickly, but it can also lead to us skipping over some outrageous errors without seeing them.

Here’s an example of what can go wrong. A healthcare provider had thousands of flyers printed to invite the local community to a ‘Pubic Health Day’. Of course, the flyers were meant to read ‘Public’. A funny mistake? The Chief Executive wasn’t laughing. Money was wasted on printing those useless flyers.

This example also perfectly demonstrates the unreliable nature of spellcheckers. ‘Pubic’ wouldn’t have been picked up by a computer program because it is a word; just not the right word here. Involving an editor or proofreader in the process would have saved a lot of time, money and embarrassment.

Who edits the editors?

It’s amazing how often good writers develop blind spots and fail to notice clanging typos and clichéd or overused words or terms.

Mismatched images and captions are another common area for mistakes, along with wonky formatting, punctuation and grammar. A text can have too few or too many headings, a variety of fonts and a host of other issues. Even copy-editors benefit from help with their own text and regularly seek the assistance of proofreaders to pick up on the unintentional typos and grammatical slips that can plague even the most elegant writing. Proof-editing (a combination of copy-editing and proofreading) is a comprehensive way to capture all of the problems with a piece of text, and turn good writing into excellent writing.

Don’t live to regret your words

It’s an editor’s job to help you make the most of your writing. But, perhaps more importantly, an editor will also help you to keep your reputation intact, making sure any written mistakes are never made public. (Or should that be pubic?)

As far as a verbal filter is concerned … well, drop me a line if you find the answer to that one!


For local, qualified copy-editors and proofreaders, take a look at our Directory now.

ABOUT THE AUTHOR

Chris is an editor, proofreader and copywriter, with over ten years of experience across business, organisational and creative writing areas.